


 Share on Twitter
Kendo UI templates and MVVM data-binding tooling enable a developer to build very modern and maintainable projects. Kendo UI is mostly known for their intuitive and customizable widget library. However, using these widgets should not come at the expense of more modern code management techniques such as MVVM data-binding and templates. Let’s take a look at some example projects and play around with creating templates and then binding to a view model.
Let me begin by saying I have no affiliation with Telerik and Kendo UI. I like the product and use the library on a number of projects I have been involved in. Since most of my projects have a great deal of data to display, I really need the data-visualization widgets and the ability to let a user maintain data with widgets like the grid. However, what I really like is easy to maintain code. Data-binding is an excellent way to make this happen as long as it still plays nice with the widgets that are doing the work.
It’s probably not as well known that Kendo UI provides template tools and MVVM data-binding. The introduction documentation for using Kendo UI is all JQuery based without much separation between the view and the underlining data. Since manually grabbing Kendo UI components and performing logic can get pretty nasty and difficult to maintain a few options were developed. AngularJS support is available if you are willing to take on the overhead. If you’re like me and just want easy to understand tooling and maintainable code then the provided tooling with Kendo UI will work just fine.
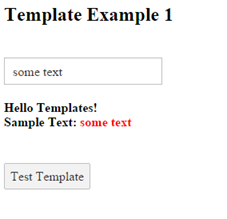
I have provided a sample github project where I have created three very basic Kendo UI template and data-binding examples. Let’s start by first declaring a template in kendo with a dynamic field:
var template = kendo.template('Hello Templates!</br>Sample Text: <span style=\"color: red;\">#:data.someText#</span>');")In this example, the template takes a string value located between the ‘#:’ and ‘#’. You can display dynamic content in two ways, ‘#=SomeValue#’ will display the content as HTML. Using ‘#:SomeValue#’ will display HTML encoded data. You can also run JavaScript within ‘#’ characters to use conditional statements or even run a function. The defined Kendo template can be executed as a function to return HTML as a string like so:
template({ someText: someText })Notice we are passing in an object with ‘someText’ defined that will be interpreted by the template. Combining this with JQuery to render the final result we get:
$('#simpleTemplateContent').html(template(
    { someText: someText }
  ));
Alright, simple enough but very manual. How about instead of injecting the template into our DOM, let’s instead bind a template to a set of data. This way, if we update the data set, the display will update for us. Let’s also add in a Kendo UI drop down list to show how the integration works MVVM style.
Let’s start by creating a simple input text box and drop down to collect data from a user. When the user clicks the ‘Test Template’ button, we want to update a table with the new data.
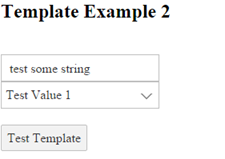
Our view includes the declarative version of a Kendo drop down list. If you haven’t used this approach before, you can define all the same properties of a kendo widget but instead of passing in the settings in the javascript call, you define them in the html attributes. When kendo binds the view model to the html, the html is converted into the widget.
<input id="someDropDownValue"
  data-role="dropdownlist"
  data-text-field="Text"
  data-value-field="Value"
  data-bind="value: dropDownValue,
    source: dropValues" />
This drop down list expects a list of objects in the view model called ‘dropValues’. Each object in the list should have a ‘Text’ and ‘Value’ attribute as specified in the HTML ‘data-test-field’ and ‘data-value-field’. The declarative version can take some getting used to but essentially each parameter should be prepended with a ‘data-‘, lower case only and use a ‘-‘ instead of spaces. Inside the attribute, define everything exactly as you would in the JavaScript declaration. The HTML for the input text box, the drop down list and the button are as follows:
<input class="k-textbox"
  type="text" id="someText"
  style="margin-top: 20px;"
  data-bind="value: textField" />
<div>
  <input id="someDropDownValue"
    data-role="dropdownlist"
    data-text-field="Text"
    data-value-field="Value"
    data-bind="value: dropDownValue,
      source: dropValues" />
</div>
<div class="k-button"
  data-bind="click:
  buildTemplate"
  style="margin-top: 20px;">
    Test Template
</div>
Now, when we click the button we want to add the data from the text box and the drop down list to a table. This involves two parts, one is the table declaration and the second is the template we want for each row. The template should take two text fields, one for the text box and the other for the drop down list.
<table style="margin-top: 30px">
  <tr>
    <th style="width: 300px;">Some Text</th>
    <th style="width: 300px;">Drop Down Value</th>
  </tr>
  <tbody id="simpleTemplateContent"
    style="margin-top: 20px;"
	data-bind="source: tableData"
	data-template="templateTest">
  </tbody>
</table>
<script id="templateTest" type="text/x-kendo-template">
  <tr>
    <td>#=someText#</td>
    <td>#=dropDownValue#</td>
  </tr>
</script>
Next up, lets define our view model. We need to bind the input text box to a string field, the drop down list to an object, provided the list of drop down options, a function for the button to call, and finally, a list of data to fill the template table. Basically, anywhere you see ‘data-bind’ in the HTML needs a field in the view model, and yes the names need to match. ‘data-bind=”value: textField”’ needs a value ‘textField’ in the view model to bind correctly.
var viewModel = kendo.observable({
  buildTemplate: function () {
    this.tableData.push({
      someText: this.textField,
      dropDownValue: this.dropDownValue
    });
  },
  dropValues: [
    { Text: 'Test Value 1', Value: 1 },
    { Text: 'Second Test Value', Value: 2 },
    { Text: 'Some Third Value', Value: 3 },
  ],
  dropDownValue: '1',
  textField: '',
  tableData: []
});
If you’re following along in the example project, you will notice that I do not call kendo.observable. This is because I am using a Single Page Application (SPA) helper called Mokuso which does this for me. I’ll blog on Mokuso in the future but it runs the transition between the different view models and binds on page transition. To bind the view model manually, you need to call kendo.bind:
kendo.bind($("#view"), viewModel);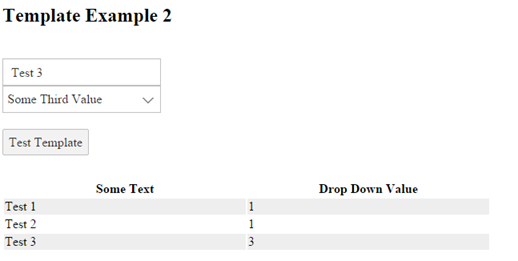
Ok, but what’s the point? Well, notice in the view model function ‘buildTemplate’ we never access the HTML? All we have to do is push data to the view model list ‘tableData’ and the HTML automatically updates for us. Try removing a value, the table should respond accordingly. Nothing in the view model references or maintains the HTML and the HTML doesn’t run logic on the view model. We now have separation of concerns and easier to maintain code.
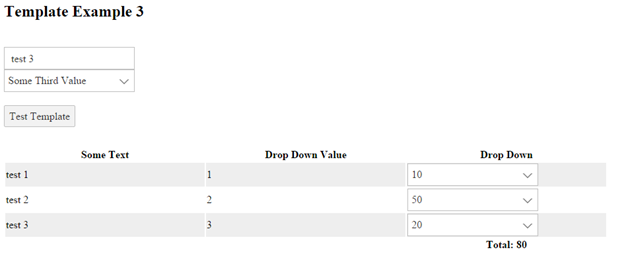
In the third example, let’s add another kendo widget but this time lets place it inside the template. Remember, the code organization tools are great but they need to play well with the widgets. We will use the same setup as example 2 but with a drop down list in each row of the table. The HTML is the same except for the table and the template which should now look like this:
<table style="margin-top: 30px">
  <tr>
    <th style="width: 300px;">Some Text</th>
    <th style="width: 300px;">Drop Down Value</th>
    <th style="width: 300px;">Drop Down</th>
  </tr>
  <tbody id="simpleTemplateContent"
    style="margin-top: 20px;"
    data-bind="source: tableData"
    data-template="example3TemplateTest">
  </tbody>
    <tr>
      <th></th>
      <th></th>
      <th>
        <strong>
        Total:
          <span data-bind="text: tableDataSum">
          </span>
        </strong>
      </th>
    </tr>
</table>
<script id="example3TemplateTest" type="text/x-kendo-template">
  <tr>
    <td>#=someText#</td>
    <td>#=dropDownValue#</td>
    <td>
      <input data-role="dropdownlist"
      	data-text-field="Text"
      	data-value-field="Value"
      	data-placeholder="Select..."
      	data-bind="value: arrayDropDownValue,
		  source: arrayDropValues" />
    </td>
  </tr>
</script>
Everything is the same except the third column of the table now contains our new drop down list and we have a total shown at the bottom of the table. The drop down options are sourced through ‘arrayDropValues’ which is an array of ‘Text’ ‘Value’ objects we will place at the root of our view model. The value of the drop down list is bound to the field ‘arrayDropDownValue’ which needs to be in every object pushed into the array ‘tableData’. For now, we are going to push in a null value in our ‘buildTemplate’ method:
var viewModel = kendo.observable({
  buildTemplate: function () {
    this.tableData.push ({
      someText: this.textField,
      dropDownValue: this.dropDownValue,
      arrayDropDownValue: null
    });
  },
  dropValues: [
    { Text: 'Test Value 1', Value: 1 },
    { Text: 'Second Test Value', Value: 2 },
    { Text: 'Some Third Value', Value: 3 },
  ],
  arrayDropValues: [
    { Text: '10', Value: 10 },
    { Text: '20', Value: 20 },
    { Text: '50', Value: 50 },
  ],
  dropDownValue: '1',
  textField: '',
  tableData: []
});
Now we need to demonstrate that we can access the value within the drop down list of each row. To do this, we will add a function to the view model called ‘tableDataSum’:
tableDataSum: function () {
  var total = 0;
  this.get('tableData').forEach(function(i) {
    total += i.arrayDropDownValue ? i.arrayDropDownValue.Value : 0;
  });
  return total;
}
This method will return the sum of all rows within the table. The important piece is the ‘this.get’ method. This is the flag to Kendo that we have a dependency. We want to tell the kendo binding engine that ‘tableData’ is used in this method and when it changes, re-run the function AND update the view to match. It helps to see this in action but if we change a drop down value of a row in the table we expect it to update the total that is listed at the bottom of the table.
The result is a fairly complex workflow but the code is easy to follow with excellent separation of concerns. If a value in the view model changes, nothing needs to be done to update the view, it just happens. Same goes for the view, if a user changes a drop down value, the view model updates to match and propagates the result to the other view model fields as needed. Want to try extending the example? Instead of aggregating the sum, plot the sum on a line chart. Just bind the chart to the ‘tableData’ array and select the field you want to see.
Feel free to ask questions or post feedback in the comments below!